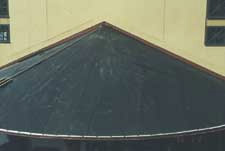
STEP 1
Felted and vertical chalk lines are drawn |
![](https://i0.wp.com/www.mca-tile.com/wp-content/uploads/2017/02/TurretInstall_1.jpg?resize=225%2C151&ssl=1) |
STEP 2
Wood stringer (optional) and birdstop installed |
![](https://i0.wp.com/www.mca-tile.com/wp-content/uploads/2017/02/TurretInstall_2.jpg?resize=225%2C151&ssl=1) |
STEP 3
Close-up of birdstop at eave line |
![](https://i0.wp.com/www.mca-tile.com/wp-content/uploads/2017/02/TurretInstall_3.jpg?resize=225%2C151&ssl=1) |
STEP 4
Beginning of booster, starter and pan installation |
![](https://i0.wp.com/www.mca-tile.com/wp-content/uploads/2017/02/TurretInstall_4.jpg?resize=225%2C151&ssl=1) |
STEP 5
Felted and vertical chalk lines are drawn |
![](https://i0.wp.com/www.mca-tile.com/wp-content/uploads/2017/02/TurretInstall_5.jpg?resize=225%2C151&ssl=1) |
STEP 6
Starter tiles installed |
![](https://i0.wp.com/www.mca-tile.com/wp-content/uploads/2017/02/TurretInstall_6.jpg?resize=225%2C151&ssl=1) |
STEP 7
Side view of booster, starter and top |
![](https://i0.wp.com/www.mca-tile.com/wp-content/uploads/2017/02/TurretInstall_7.jpg?resize=225%2C151&ssl=1) |
STEP 8
Turret three-fourths complete |
![](https://i0.wp.com/www.mca-tile.com/wp-content/uploads/2017/02/TurretInstall_8.jpg?resize=225%2C151&ssl=1) |
STEP 9
Last 3 to 4 courses to install |
![](https://i0.wp.com/www.mca-tile.com/wp-content/uploads/2017/02/TurretInstall_9.jpg?resize=225%2C151&ssl=1) |
STEP 10
Use color mastic (optional) to seal top area |
![](https://i0.wp.com/www.mca-tile.com/wp-content/uploads/2017/02/TurretInstall_10.jpg?resize=225%2C151&ssl=1) |
STEP 11
Installation of final course |
![](https://i0.wp.com/www.mca-tile.com/wp-content/uploads/2017/02/TurretInstall_11.jpg?resize=225%2C151&ssl=1) |
STEP 12
Completed Turret |
![](https://i0.wp.com/www.mca-tile.com/wp-content/uploads/2017/02/TurretInstall_12.jpg?resize=225%2C151&ssl=1) |